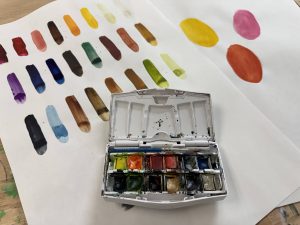
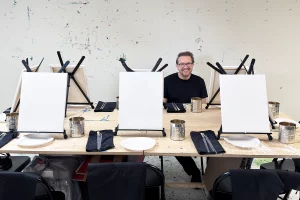
If you live in Dallas and have ever stood in front of a watercolor painting and thought, I wish I could do that, this guide is for you. Watercolor looks effortless from a distance. Up close, it is a medium with opinions. It blooms where you do not expect it. It dries lighter than you planned. And once you understand a few basics, it becomes one of the most rewarding ways to spend an evening.
I am Bartosz Beda, a painter and instructor based in Dallas. I teach Thursday evening watercolor classes at the Art Be You studio in Richardson, and most of my students walk in having never painted before. This guide answers the questions I hear most: what you will actually learn, which supplies matter, what a class feels like, and the mistakes that trip up every beginner. By the end, you will know whether watercolor is for you, and exactly what to expect if you decide to try it.
Let us start with the reason so many people fall for this medium in the first place.
Why watercolor hooks people
The glow
Watercolor is the most honest of the painting mediums. Oil paint lets you scrape off a mistake and start over. Acrylic dries fast and covers everything underneath. Watercolor shows every decision you made, and that transparency is exactly what makes it beautiful. Light passes through the pigment and bounces off the white paper underneath, which gives watercolor paintings a glow that no other medium quite matches. Once you see that glow in person, in a real painting and not on a screen, it is hard to forget.
The pace
There is also something about the pace of it. Watercolor forces you to slow down and pay attention. You mix a wash, lay it down, and watch what the water does. You cannot rush the drying, so you learn to work with the medium instead of against it. Many of my students tell me the three hours of class are the calmest part of their week. In a city that runs as fast as Dallas does, that matters more than people expect when they sign up.
Portable and affordable
Then there is the practical side. Watercolor is portable and clean. You do not need a ventilated studio or a trunk full of supplies. A small kit fits in a tote bag, which means you can paint at White Rock Lake on a Saturday morning or sketch the gardens at the Dallas Arboretum without planning an expedition. It is also one of the most affordable mediums to start. A few tubes of paint, a pad of decent paper, and two good brushes will carry you through your first months, and that is not true of oil or acrylic.
- The glow: transparent pigment over white paper creates a luminosity you cannot get any other way
- The pace: drying time builds patience and attention into every session
- The portability: a full kit fits in a tote bag, perfect for painting around Dallas
- The cost: starting watercolor costs far less than a comparable oil or acrylic setup
- The calm: students consistently describe class as the most relaxing part of their week
If any of that sounds appealing, you are already the right kind of person for a beginner class. You do not need talent. You need curiosity and a free Thursday evening. Everything else, we build together.
Core techniques beginners learn
Every beginner class at Art Be You is built around a handful of core techniques. Once you can control these, you can paint almost anything. We introduce them one at a time so nobody feels overwhelmed, and each one gets practiced inside a real painting, not just on an exercise sheet. That matters, because techniques only stick when you use them to make something you care about.
The flat wash
The flat wash is where everyone starts. It is the smooth, even layer of color that covers skies, backgrounds, and large areas. It sounds simple and it humbles everyone the first time. Learning to load the brush with the right amount of water, tilt the paper slightly, and pull the color down in overlapping strokes teaches you the single most important watercolor skill there is: water control. Get the wash right and half of watercolor gets easier immediately.
Wet-on-wet
Wet-on-wet comes next, and it is the technique that makes people gasp. You wet the paper first, then drop pigment into the damp surface and watch it bloom and spread on its own. This is how you paint soft skies, distant trees, and atmospheric backgrounds. It feels like magic the first time, but it is really just physics, and once you understand timing, you can repeat it on purpose instead of by accident.
Layering and glazing
Layering, also called glazing, is how watercolor builds depth. You let one transparent layer dry completely, then paint another over it. Each layer deepens the color and adds richness without turning muddy. This is the technique behind those luminous paintings that look like they glow from inside. It also teaches the most valuable beginner habit of all: patience. The paint has to dry. There is no shortcut, and learning to wait is part of the craft.
Lifting
Lifting is watercolor’s version of an eraser, more or less. While the paint is still damp, you can blot it with a thirsty brush or a paper towel to pull color back up and reveal the white paper underneath. It is how you rescue highlights, soften an edge that went too hard, or fix a shape that drifted off course. Beginners love this one because it removes the fear of ruining a painting. Knowing you can lift takes the pressure off every stroke.
- Flat wash: smooth, even color for skies and backgrounds; teaches water control
- Wet-on-wet: pigment dropped into damp paper for soft, blooming effects
- Layering (glazing): transparent layers built up for depth and luminosity
- Lifting: blotting damp paint to recover highlights and soften edges
- Dry brush: dragging a nearly dry brush across the paper for texture like grass or wood grain
- Color mixing: learning which few pigments mix clean secondary colors without turning muddy
Color mixing and your toolbox
We also spend real time on color mixing, because watercolor has a reputation for turning muddy and the fix is simpler than people think. You will learn which pigments play well together and why a limited palette gives cleaner results than a box of twenty-four tubes. By the end of a three-week session, students can look at a simple landscape or still life and know exactly which techniques to reach for. That is the real goal. Not one perfect painting, but a toolbox you own and can use on your own.
Supplies: what matters and what doesn’t
Beginners tend to make the same two mistakes with supplies. Some buy the cheapest possible kit and fight their materials for weeks, concluding they have no talent when really they have bad paper. Others buy everything the art store sells and feel guilty about the drawer full of unused tubes. The truth is in the middle, and it is simpler than the shelves at the art supply store suggest.
Paper matters most
Paper matters more than anything else. This is the one place where quality genuinely changes what you can do. Cheap cellulose paper buckles, pills under the brush, and refuses to lift paint, which makes every single technique harder than it needs to be. Paper made from 100 percent cotton behaves completely differently: it stays flat, takes washes evenly, and lets you lift color back off when you need to. You do not need the most expensive brand on the shelf, but cotton paper in the 140 lb weight is the single best investment a beginner can make. If you remember one thing from this section, remember that.
Paint: fewer tubes, better pigment
Paint comes second. You do not need many colors, and this surprises people. A small set of artist-quality or good student-quality tubes, a warm and cool version of each primary plus one or two earth tones, will mix every color you will ever need as a beginner. What matters is pigment load. Cheap paints are mostly filler, so your washes look chalky and weak no matter how well you paint. A handful of good tubes beats a big box of weak ones every time, and it costs less in the long run because you are not replacing everything in a month.
Brushes: less is more
Brushes come third, and here less is more. Two or three good brushes will handle everything in a beginner class: a large round for washes, a medium round for general work, and maybe a small round for details. What you want is a brush that comes to a fine point, holds a good amount of water, and springs back into shape. One brush like that is worth more than a roll of twenty scratchy ones that splay after a week.
What does not matter yet
What does not matter much at the start:
- A giant palette with thirty wells. A plain white dinner plate works perfectly for mixing.
- Masking fluid, specialty mediums, and gadgets. Fun later, distracting now.
- An easel. Watercolor is usually painted flat or tilted just slightly.
- The most expensive brand of anything. Solid mid-range supplies from a real art store outperform premium marketing every time.
- A dedicated studio space. A kitchen table with a board underneath your paper is how most painters start.
Come first, buy second
One more thing worth saying clearly: you do not need to buy anything before your first class. Materials guidance is part of what we cover together, and I would rather you spend money once, on the right things, after you have tried them in class. Students who arrive with a random kit from a big-box store often end up replacing most of it within weeks. Come first, buy second. Your wallet will thank you.
What a Thursday evening class looks like
Small groups, real people
Classes meet on Thursday evenings from 6 to 9 PM at the Art Be You studio, 500 E Arapaho Rd in Richardson. The groups are small on purpose. Everyone gets individual attention, and nobody hides in the back row. Most students are adults trying painting for the first time, or returning to it after twenty or thirty years away. If you are picturing a room full of art prodigies, let that picture go. It is mostly nurses, engineers, teachers, and retirees who finally decided to try.
A loose rhythm, not a fixed schedule
Each evening has a comfortable rhythm rather than a rigid timetable. It starts with a short warm-up, a quick demo or exercise to get your hand and eye working together. Then I demonstrate the evening’s painting stage by stage, and you paint each stage yourself while I circulate the whole time. If your wash is misbehaving, I am right there to show you why and how to fix it. There is usually a short break midway to stretch, refill water cups, and see what everyone else is doing. We finish by looking at the evening’s pieces together and talking about what worked.
No two Thursdays run exactly the same, because no two groups are ever at the same place in their paintings. The structure flexes to what the room needs that night.
You finish a painting every session
You will finish a complete painting in every session. That is deliberate. Beginners need the experience of starting and finishing, not just drilling exercises on scrap paper. Taking home a finished piece each week is also what keeps people coming back. There is something powerful about pinning your third painting on the fridge and seeing how far you have come since the first.
The atmosphere
The atmosphere is relaxed but focused. There is no critique circle and nobody’s work gets ranked or graded. People chat while they paint, and the room tends to feel more like a good dinner party than a classroom. If you are nervous about being the worst painter in the room, know that everyone else is thinking the exact same thing, and within twenty minutes nobody is thinking about it at all. They are too busy watching paint dry, which turns out to be genuinely fascinating.
Common beginner mistakes and how a class fixes them
Everyone makes the same mistakes at the start. Knowing them in advance helps, but the real fix is having someone watch you paint and catch them in the moment, before they become habits. Here are the five I correct most often, and what we do about each one.
Too much water, or too little
Using too much water, or too little. Watercolor is a negotiation between pigment and water, and beginners usually pick a side and commit to it. Too much water and everything turns to soup: colors run where they should not, edges disappear, and the paper buckles into hills. Too little water and the paint drags, looks chalky, and refuses to blend. In class, I can look at your brush and your paper and tell you which way to adjust before the painting is ruined. After a few sessions, your hand learns the feel and you stop having to think about it.
Overworking the painting
Overworking the painting. This is the big one, the mistake behind most muddy beginner work. You lay down a wash, decide it is not quite right, and keep brushing it while it dries. Every extra stroke lifts the half-dry pigment and churns the area into mud. The fix is learning to lay a stroke down and leave it alone, which is a discipline problem more than a skill problem. Painting next to an instructor who says “stop, let it dry” at the right moment trains the habit in weeks instead of months.
Muddy color mixing
Muddy color mixing. That brownish gray where you wanted green is almost always caused by mixing too many pigments at once, or by mixing complementary colors without realizing it. In class you learn a simple rule that solves most of it: most mixtures need only two pigments, three at most. We also work from a limited palette on purpose, so clean mixing becomes a habit rather than something you have to remember.
The quick-reference list
- Mistake: flooding the paper, then fighting the puddles. Fix: learn to read the sheen of damp paper before adding more paint.
- Mistake: scrubbing at a wash while it dries. Fix: one confident stroke, then hands off until it is fully dry.
- Mistake: mixing half the palette into mud. Fix: two-pigment mixtures and a limited palette.
- Mistake: cheap paper that pills, buckles, and will not lift. Fix: cotton paper, which forgives almost everything else.
- Mistake: no plan, painting straight in with no drawing or value sketch. Fix: two minutes of pencil planning saves twenty minutes of rescue work.
Skipping the plan
Skipping any planning at all. Beginners often start painting with no drawing and no sense of where the light and dark areas belong, then wonder why the result feels random. Two minutes with a pencil, blocking in the big shapes and marking the lightest lights you want to preserve, changes everything about the painting that follows. We do this together in class until it becomes automatic, and students are always surprised how much calmer the painting process feels with a small plan in place.
The pattern across all of these: the mistakes are completely normal, the fixes are simple, and learning them with guidance takes weeks instead of the many months it takes alone with videos. That is really what a class buys you. Not talent. Time.
FAQ
Do I need any experience to join a beginner class?
No. Most students have never painted before, and the class is designed exactly for that. If you can hold a pencil, you can start. The step-by-step format means nobody is ever left guessing what to do next.
What if I cannot draw?
You do not need to draw well to paint in watercolor. We work from simple shapes, and I guide the drawing stage step by step before any paint touches paper. Many students arrive convinced they cannot draw a straight line and leave surprised at what they produced.
What should I bring to the first class?
Just yourself, in clothes you do not mind getting a spot of paint on. Materials guidance is part of the class, so wait to buy supplies until you have tried things in person and know what you actually like working with.
How long are the sessions, and what does a full session include?
Classes run Thursday evenings from 6 to 9 PM at the Richardson studio. The November session runs three weeks, November 5, 12, and 19, for $225, and we take Thanksgiving week off. Three weeks is enough to learn the core techniques and finish several complete paintings. Many students continue into the next session because they want to keep going, not because they need to.
What happens if I miss a week?
Life happens. Let me know and I will make sure you know what the group covered so you can catch up. The techniques build on each other across weeks, but each evening also stands alone as a finished painting, so one missed night never ruins the session.
Is there an age range for the evening classes?
The Thursday evening classes are designed for adults. The pace, the three-hour format, and the group dynamic all assume adult learners.
Where exactly is the studio?
The Art Be You studio is at 500 E Arapaho Rd in Richardson, TX, an easy drive from anywhere in the Dallas area. Check artbeyou.com for the current schedule and directions before your first visit.
I am left-handed. Does that matter?
Not at all. Brushes do not care which hand holds them, and neither do I.
How is watercolor different from the acrylic classes?
Acrylic is opaque and forgiving: you can paint over mistakes and build up thick texture. Watercolor is transparent and planned: you work light to dark and preserve the white of the paper. They teach different skills and attract slightly different temperaments. Many students eventually try both. If you love control and layering, start with acrylic. If you love light, flow, and a little beautiful unpredictability, start here.
Come try it
If you have read this far, you are curious enough that you should just try it. Curiosity is the only prerequisite that matters, and one evening with a brush will teach you more about watercolor than a month of wondering whether you would be any good at it.
The next beginner watercolor session runs three Thursday evenings, November 5, 12, and 19, from 6 to 9 PM at the Richardson studio, for $225. We take Thanksgiving week off. December sessions depend on interest, so check artbeyou.com for the current schedule and to reserve your seat. Groups are intentionally small, and seats go through the website, so if November sounds right, do not wait too long.
Bring nothing but yourself. Leave with a painting. That is the whole pitch, and after one evening you will understand why people keep coming back. Visit artbeyou.com to see the current schedule and sign up. I will see you on Thursday.